Under Sink Organization for Small Kitchens Made Easy
The cabinet under the kitchen sink should be prime storage, yet in most homes it becomes a dark cave where bottles hide behind the pipes. Thoughtful under sink organization for small kitchens treats that awkward box as real storage, working with the trap, the water lines and the disposal instead of fighting them. This guide shares 30 practical ideas sized for tight cabinets, from sliding caddies and pipe friendly shelves to door racks and labelled bins. Measure your cabinet first, note where the plumbing sits, then pick the two or three ideas that fit your space. Every idea here costs little and installs fast.
Quick Answer
Organize the cabinet under a kitchen sink by working around the pipes, not against them. Measure the space first, line the floor with a waterproof mat, then add one sliding caddy or two tier shelf per side. Keep daily sprays at the front and refills at the back.
Two Tier Sliding Organizer
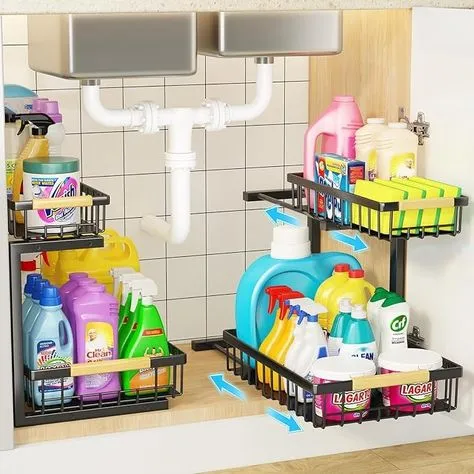
Image Credit: Pinterest (https://i.pinimg.com/1200x/e5/47/27/e54727b057977b1725cf57b16d423437.jpg)
Two tier organizers can flank the trap and turn both sides of the cabinet into working storage. The top baskets hold the sprays and dish soap you grab daily, while the lower baskets slide forward so back bottles are never lost. Because each unit is narrow, two of them fit where one wide shelf never could.
Choose smooth runners and a raised lip so bottles stay put as the basket moves. This also frees the counter beside the sink, since the cleaners finally have a tidy home.
Stackable Shelf Riser Frame

Image Credit: Shopee (https://down-sg.img.susercontent.com/file/sg-11134201-7rbk4-m7mdulb2khdn6e)
- Measure the cabinet width, depth and the height below the sink basin before ordering any frame.
- Pick a riser with an open middle so the trap and lines pass through.
- Load heavy bottles on the lower tier and light boxes, pods and cloths on the upper tier.
- Leave a finger of space at the front so the doors close without rubbing.
- Add a second frame only when the plumbing leaves a clear, square gap.
A shelf riser doubles the floor of the cabinet without drilling or tools. It lifts out in seconds when the plumber visits.
Over Cabinet Door Rack
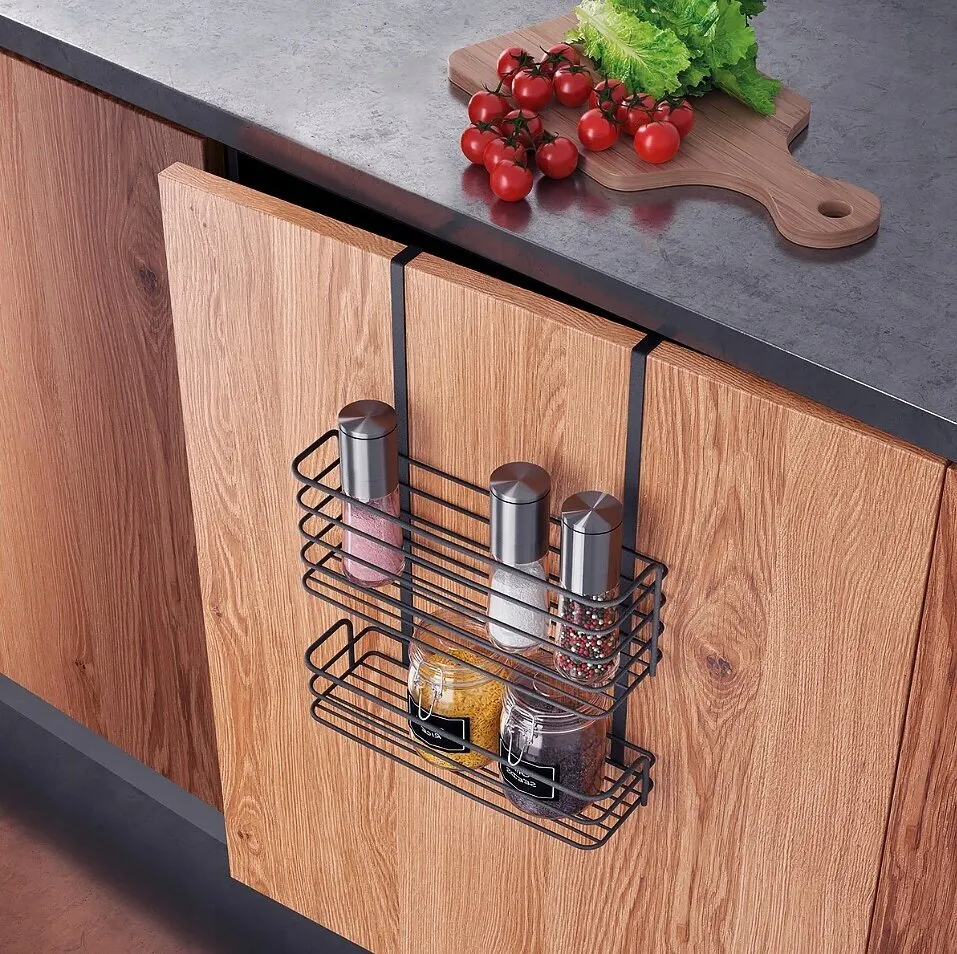
Image Credit: Kaup24 (https://kaup24.ee/ru/bytovaya-tehnika-i-elektronika/aksessuary-i-prinadlezhnosti/dopolnitelnye-aksessuary-dlya-hraneniya-tov)
Quick Tip: Add small felt pads where the hooks touch the door. The rack then sits silent and snug, and the finish on the door stays free of scratches.
The inside of the sink door is wasted space in most kitchens; a slim over door rack claims it for spice jars or small bottles. Hooks drop over the top of the door, so there is nothing to screw in. Keep the load light, under about two pounds, and flat so the door swings freely and the rack never knocks the trap.
Tension Rod Bottle Rail
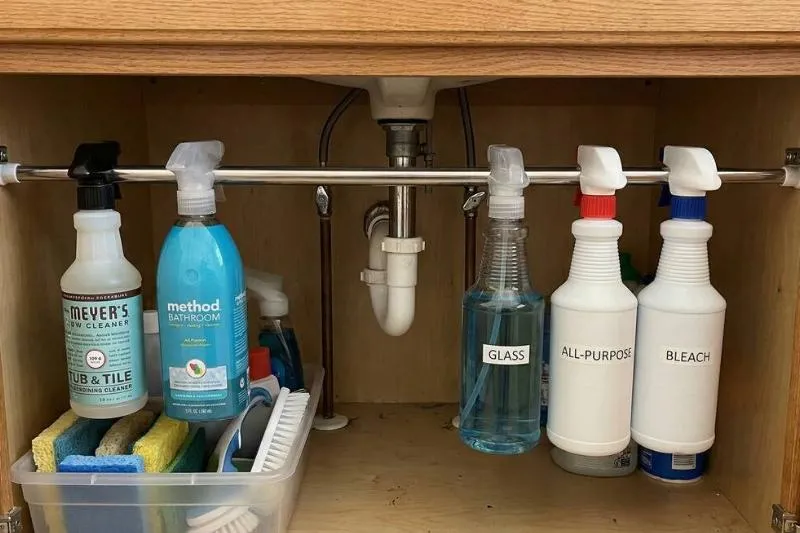
Image Credit: Man Made DIY (https://www.manmadediy.com/make-your-bathroom-instantly-less-chaotic-with-these-easy-organizati)
Before: Spray bottles crowded the cabinet floor, toppling over whenever one was pulled out, with leaking refills hidden behind the trap.
After: Every spray bottle now hangs by its trigger from a slim rod stretched across the cabinet, labels forward, above a clear bin of cloths and sponges.
A short tension rod costs very little, needs no screws, and wedges between the cabinet walls in minutes. Hanging bottles by their triggers keeps them upright, visible and off the floor, so drips are easy to spot. Measure the inside width carefully and choose a rod with strong spring tension.
Adjustable Pipe Around Shelf
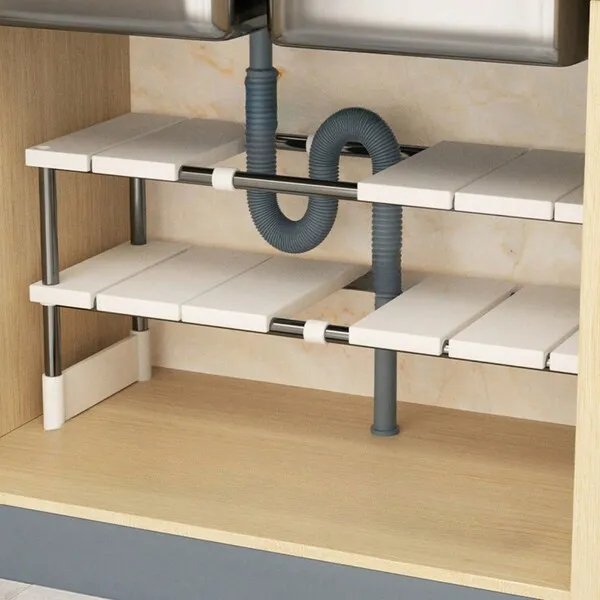
Image Credit: SHEIN (https://asia.shein.com/Kitchen-Hardware-c-9067.html?lang=asia)
- Empty the cabinet and measure around the trap, noting how low the pipe hangs.
- Assemble the frame loosely on the kitchen floor so you understand how the slats slide and lock.
- Set the frame inside and shift the slats until they clear the trap.
- Level the shelves, tighten every joint, and check the doors close freely.
- Load heavy items low and near the sides, keeping the middle slats free for pipe access.
Expandable frames suit odd cabinets because each slat moves on its own. If your plumbing is off centre, the shelf shifts with it, and you gain two full levels.
More Info : 25 Smart Kitchen Organization Ideas That Save Space
Pull Out Caddy Basket
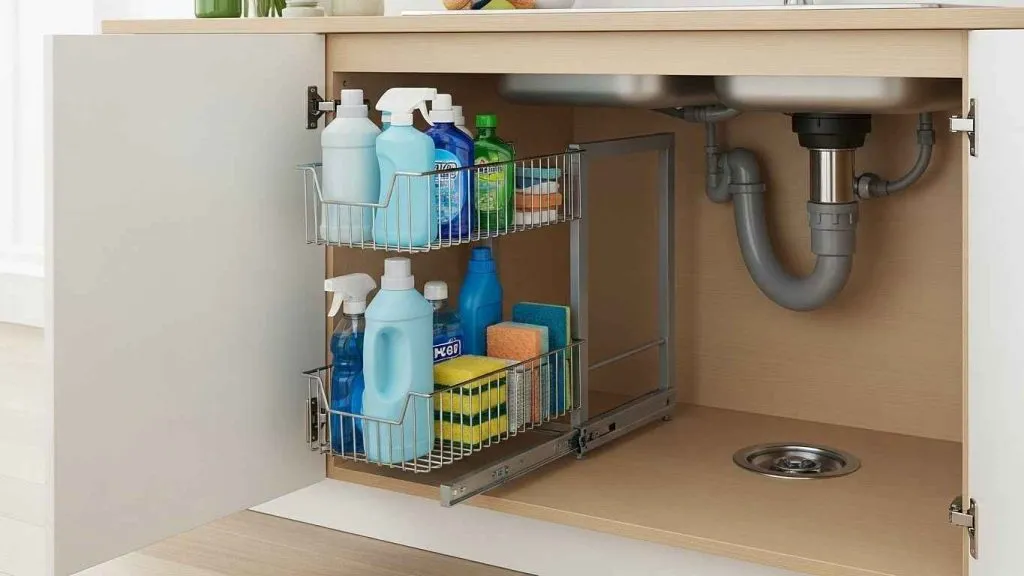
Image Credit: Kitchen Waves (https://kitchenwaves.com/kitchen-cabinet-drawers-upgrade-ideas/)
Do:
- Fix the runners to the cabinet floor so the basket stays steady when loaded.
- Group one cleaning job per basket: dish supplies in front, floor cleaners behind.
- Pull the basket fully out once a month and wipe the floor beneath it.
Don’t:
- Overload the basket with bulk refills, which strains the runners.
- Block the trap or shutoff valves behind the basket; a plumber may need fast access.
- Spray cleaner over the chrome finish, which dulls and spots the metal.
A pull out caddy suits the side away from the trap, where the floor is flat. It turns the dark back corner into storage you can reach, and carries a full cleaning kit to any room in one trip.
U Shaped Pull Out Drawer
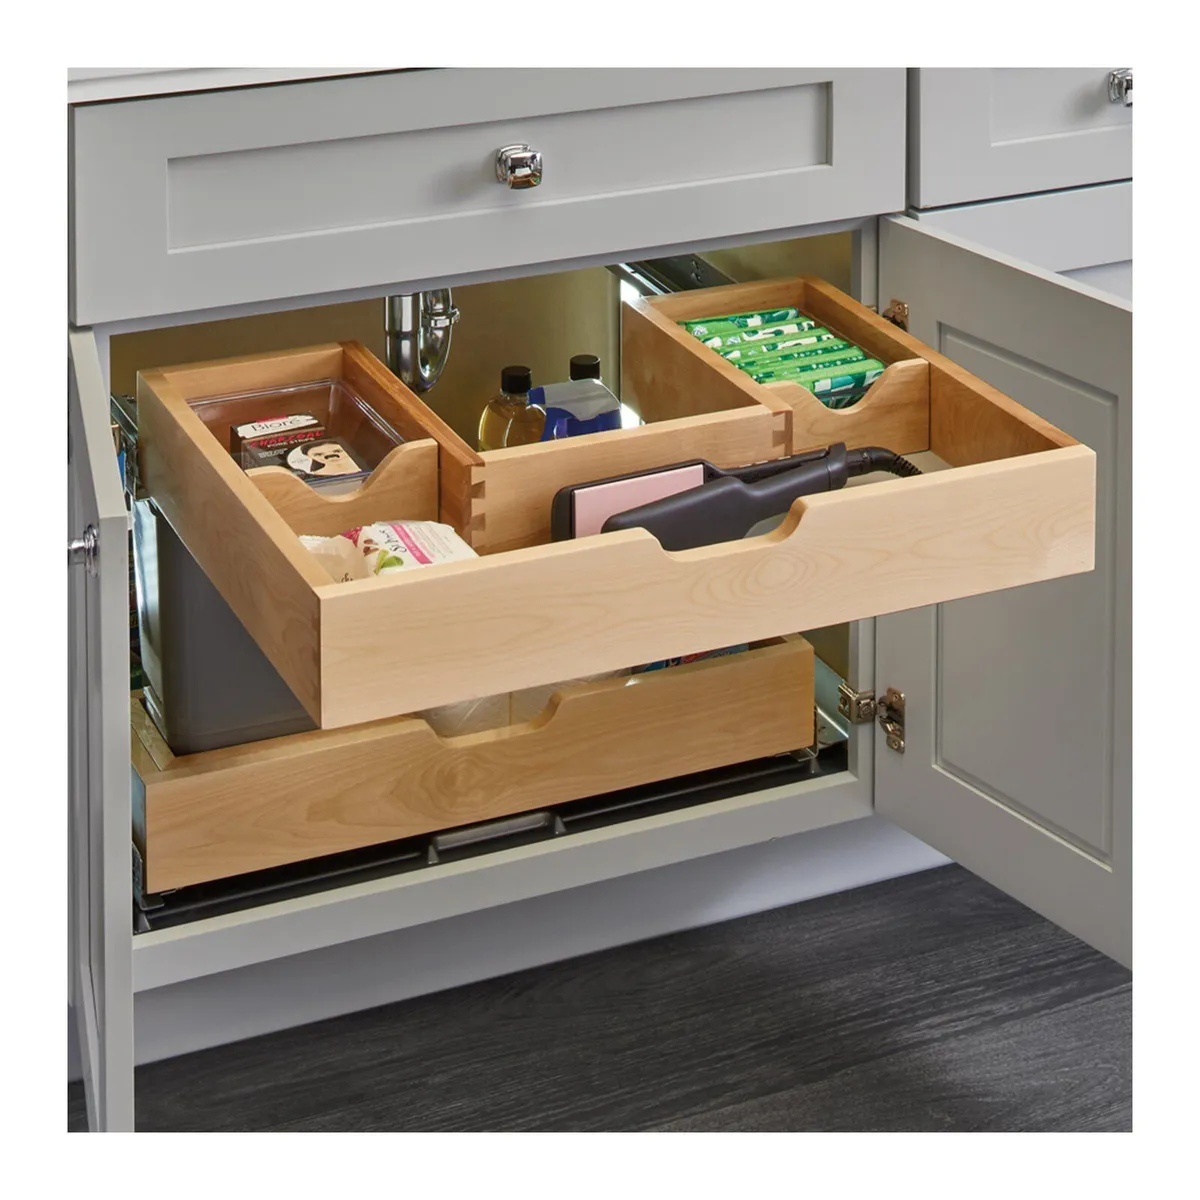
Image Credit: Pinterest (https://i.pinimg.com/1200x/c1/dd/84/c1dd84ecca9c879aea2e2a90fdd941a.jpg)
Cost: Mid range, more than a basket but far less than new cabinets
Time: About an hour to fit, including measuring around the pipes
Skill Level: Confident beginner with a drill and a tape measure
Best For: Cabinets where the trap sits dead centre and wastes both sides
A U shaped drawer wraps around the plumbing, so the notch hugs the trap while the wide front pulls supplies into the light. The wooden box glides on runners and feels built in. It is the neatest answer when bottles vanish into the dark corners beside the pipes, and it keeps everything at one level.
Rolling Under Sink Cart

Image Credit: Cimri (https://cdn.cimri.io/image/1080×1080/cimri-product-1125792290-841912244.jpg)
A slim cart on wheels is a friendly fix for a deep cabinet, because the whole unit rolls out to you instead of asking you to kneel and reach. Two tiers hold sprays above and bottles below, and open sides let the plumbing pass. Choose a cart narrower than the door opening so it rolls straight out without turning.
Carts also shine on cleaning day: roll the unit to the counter, work from it, then roll it back. Pick strong wheels and never stack bottles above the top rail.
Clear Stacking Storage Bins
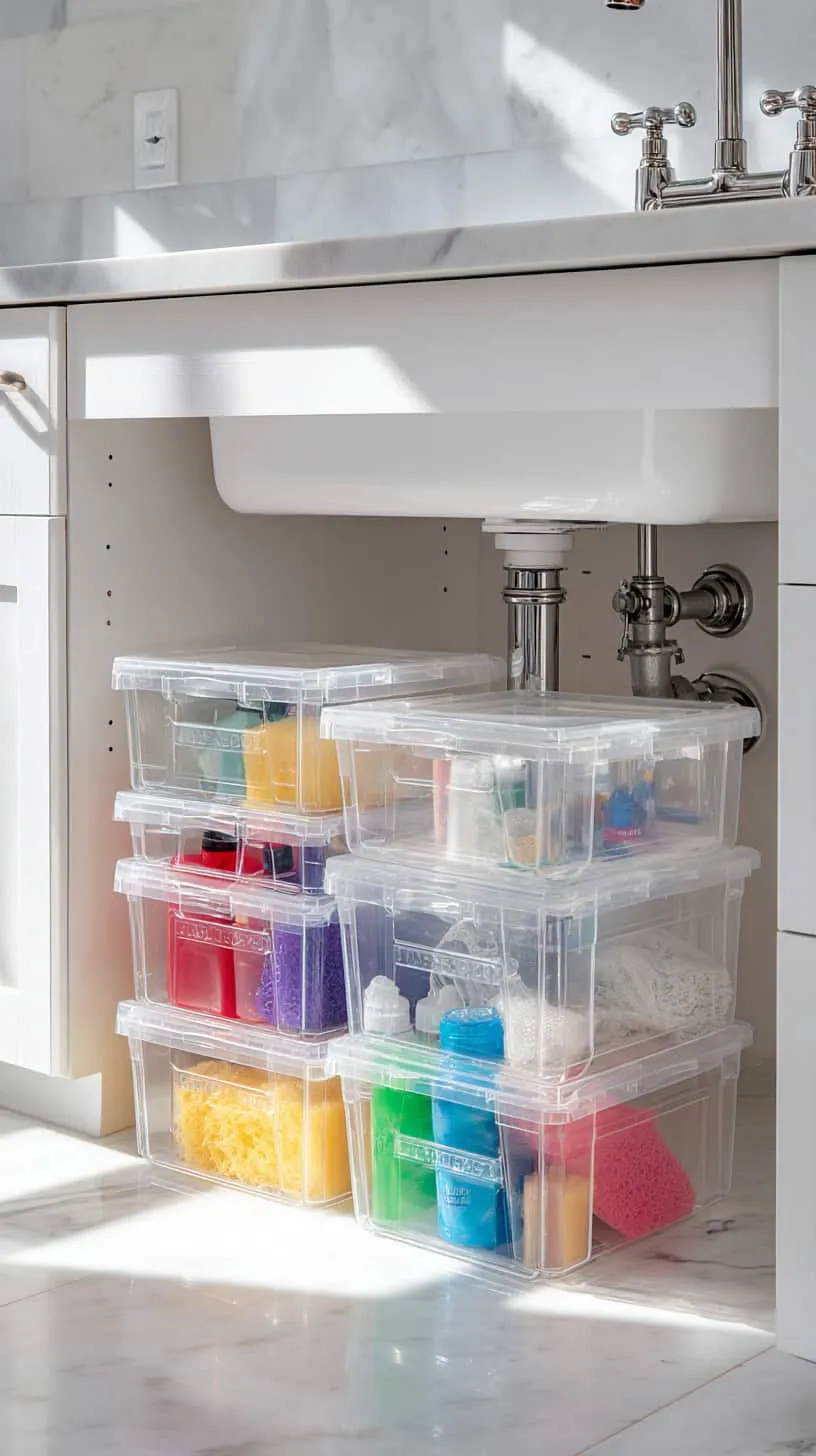
Image Credit: Chloe Crochet (http://chloecrochet.com/18-genius-under-sink-storage-ideas-for-busy-moms/)
- Sort supplies into families first: dish care, surface sprays, sponges and cloths, bags and wraps.
- Choose straight sided clear bins so two or three stack neatly.
- Keep tall bottles in one low bin at the front, where the basin never limits height.
- Slide the stack out to reach the bottom bin instead of digging.
- Wipe bins weekly, since clear plastic shows drips fast.
Clear bins beat open baskets for small, mixed items like pods, tabs and brushes. You see the contents at a glance, and a leak stays inside one washable box.
Inside Door Sponge Holder
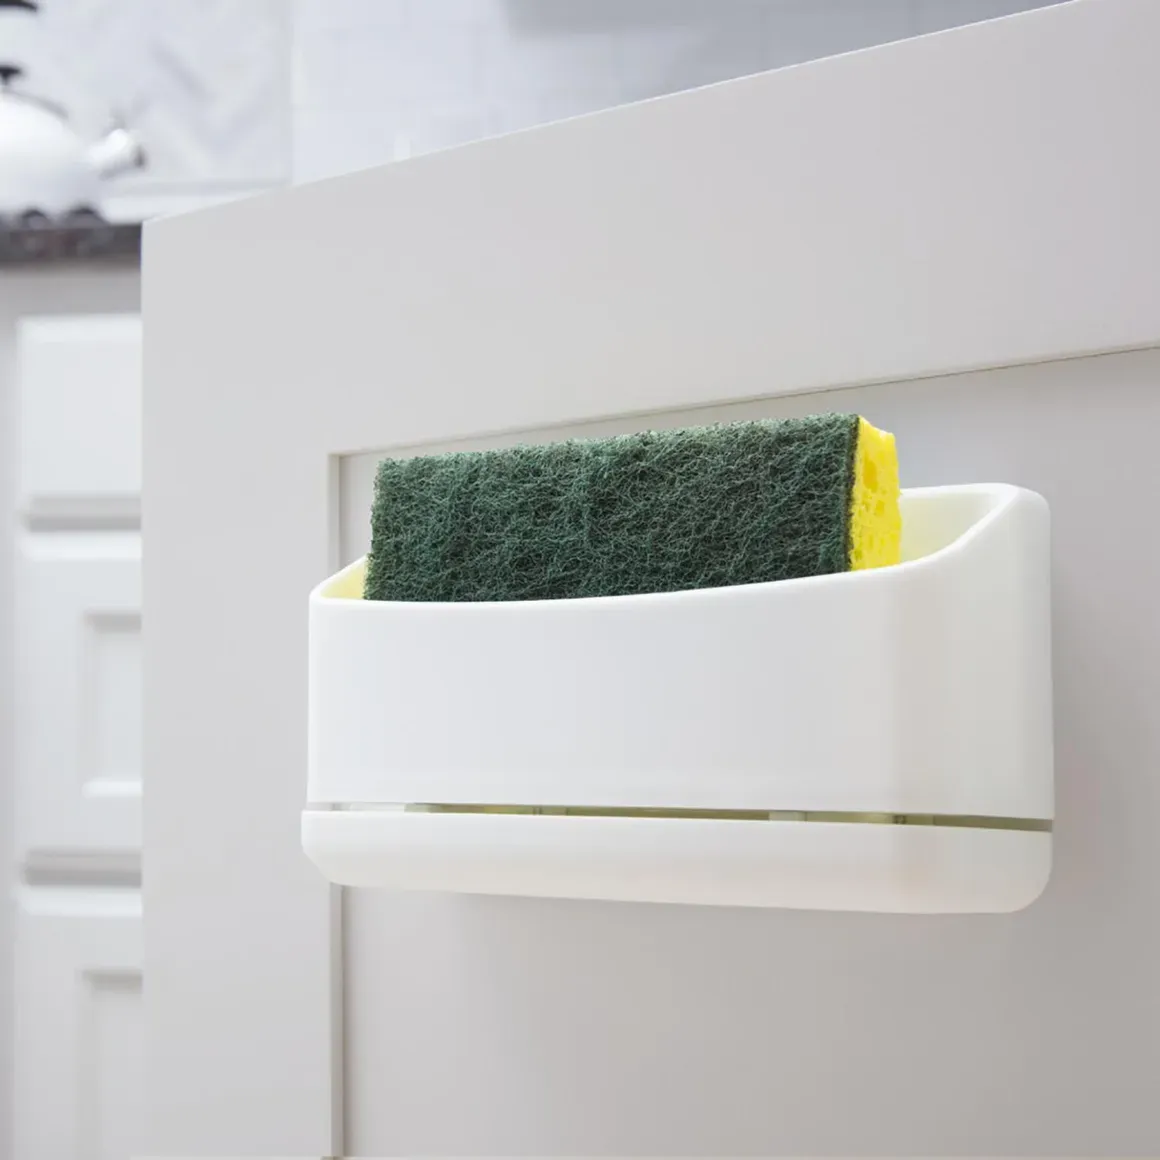
Image Credit: Sodimac (https://www.sodimac.cl/sodimac-cl/articulo/110265915/Muebles%20de%20Terraza)
Quick Tip: Press adhesive holders onto a clean, dry door and wait a full day before loading them. The bond sets properly and the holder stays put for months.
An inside door sponge holder gives a wet sponge a home off the sink edge, so the counter stays clear and the sponge dries between washes. Suction and adhesive holders cost very little, hold one or two sponges above a drip tray, and keep the counter clear. Pick a design with slots in the base so air moves freely.
Lazy Susan Turntable
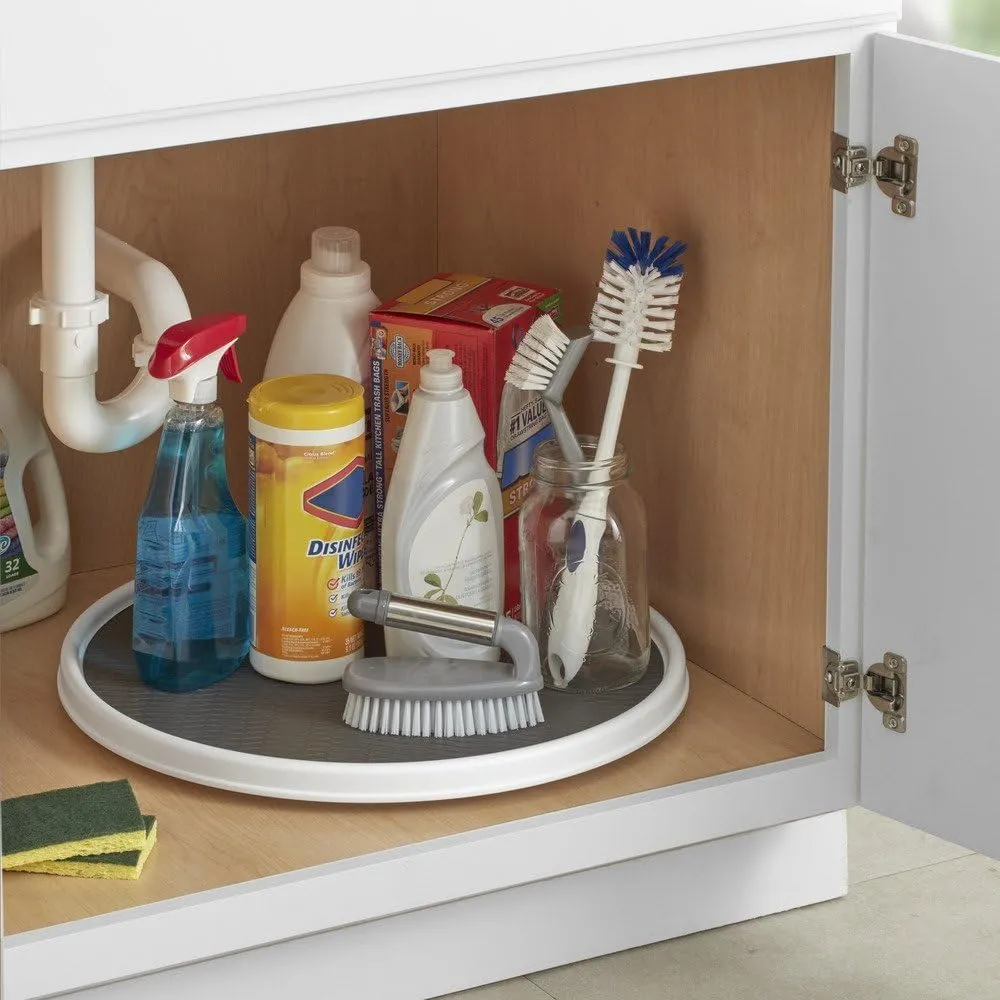
Image Credit: Mega Savers Auction (https://megasaversauction.com/lots/view/4-HV6JF1)
Before: Bottles stood three deep beside the trap, and reaching the back row meant moving every bottle in front.
After: One round turntable now holds the whole group, and a gentle spin brings any bottle to the front while the rest stay upright and in place.
A turntable works best on the wider side of the cabinet, where a circle fits without touching the pipes. Choose a raised edge and a non slip surface so bottles ride safely. The circle wastes the corners, but for a cluster of similar bottles it removes the daily dig.
Sliding Drawer Basket System
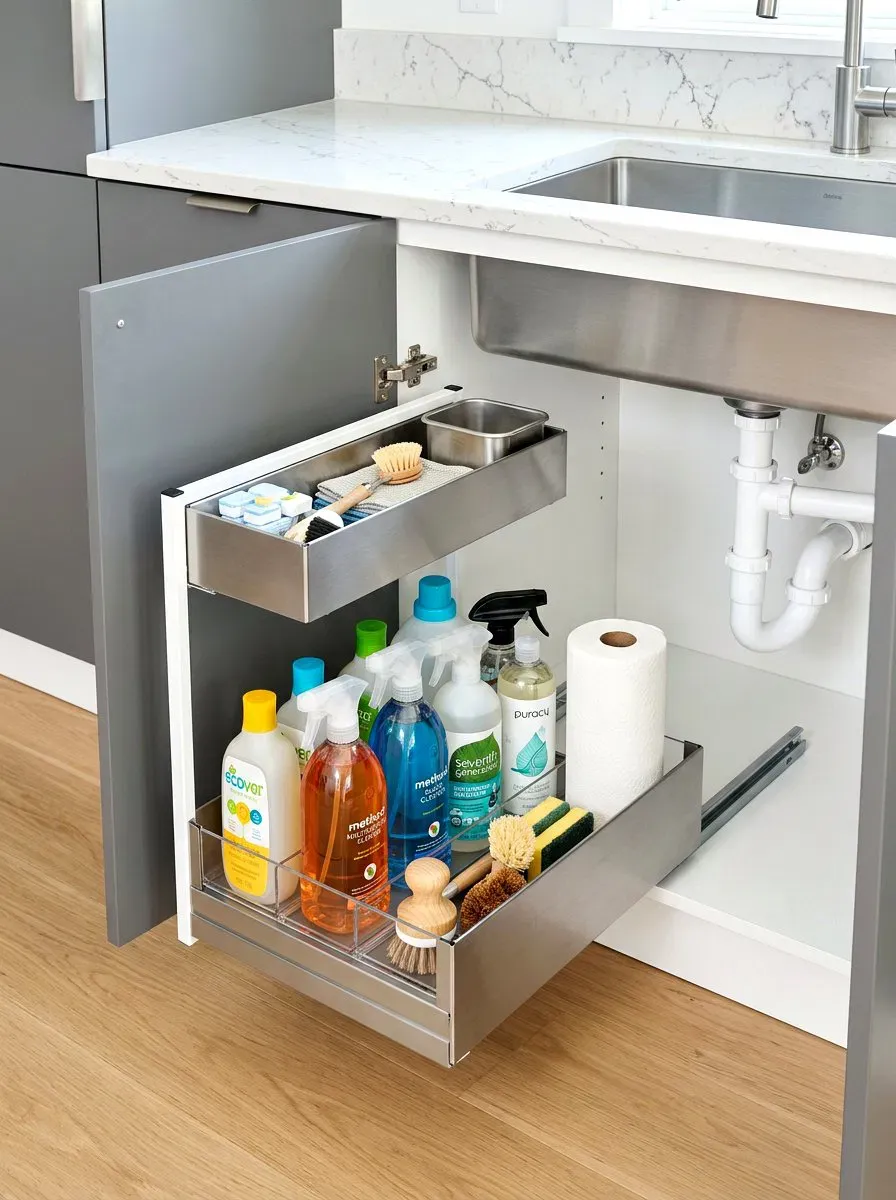
Image Credit: Suite101 (https://suite101.com/30-organizing-under-sink-storage-ideas/)
- Measure the clear floor beside the trap and choose a unit slightly narrower.
- Set the frame in place and mark the screw holes onto the cabinet floor.
- Fix the rails with short screws, checking no pipe runs beneath the floor panel.
- Slide the basket onto its runners, load it with your heaviest bottles, and test the glide several times.
- Add a thin liner so small items never slip through the mesh.
A fitted sliding drawer is the most permanent idea here, yet still a one hour job. The mesh basket keeps air moving, and the full extension glide brings the back of the drawer into the light.
More Content : Deep Pantry Organization Ideas for Easier Access
Waterproof Cabinet Floor Mat
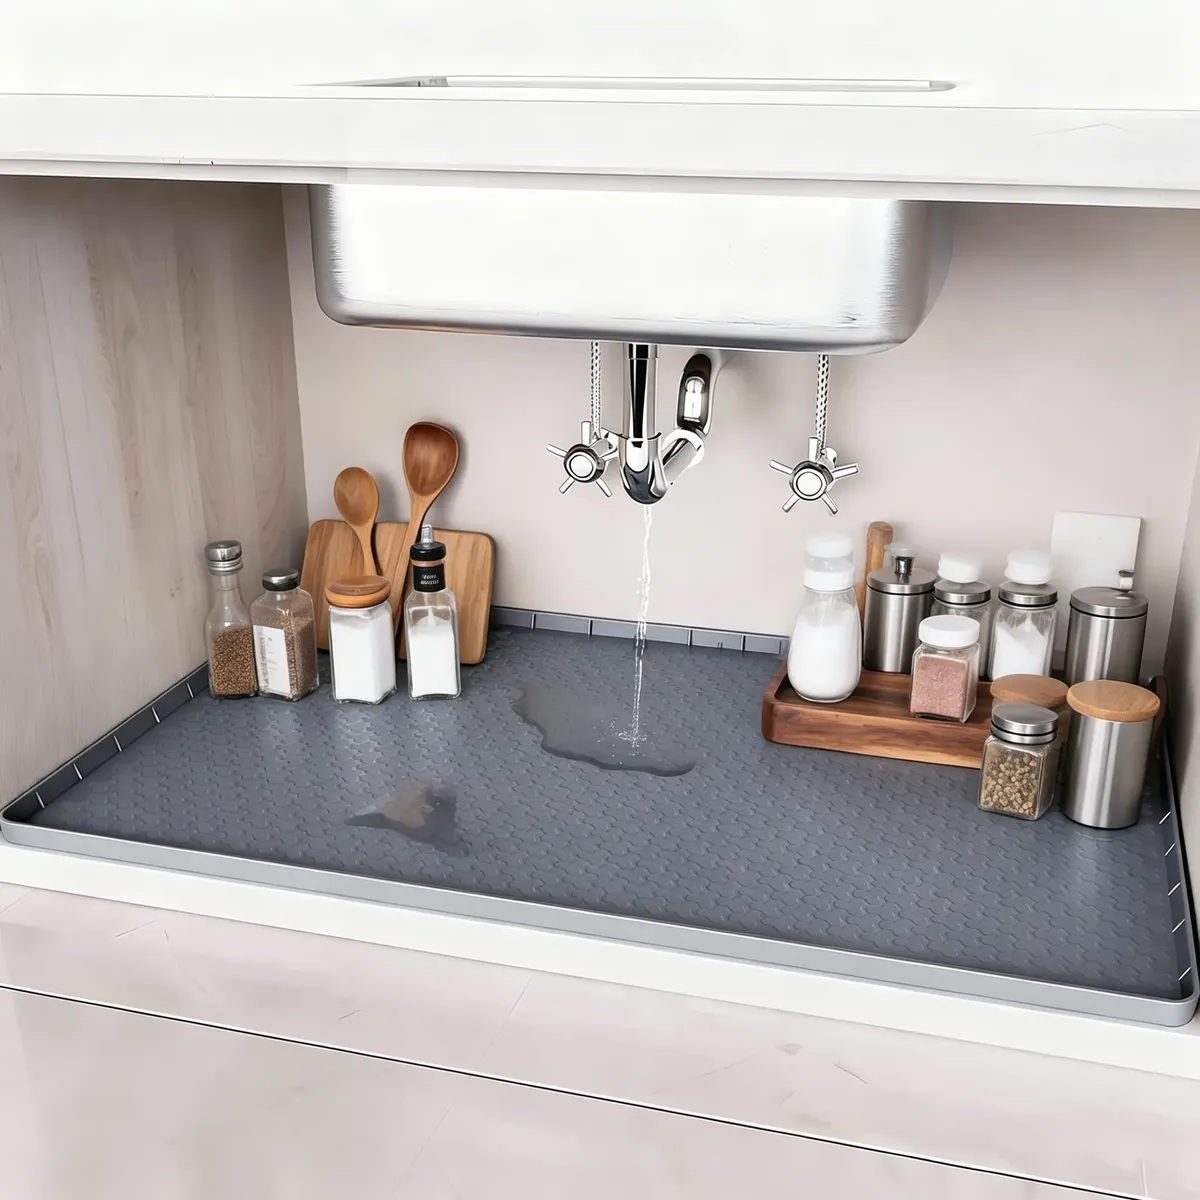
Image Credit: TikTok Shop (https://shop.tiktok.com/us/k/undersink-mat)
Do:
- Measure the floor and trim the mat so it sits flat wall to wall.
- Choose a mat with a raised edge that holds a small spill.
- Lift and rinse the mat when you spot a drip, then dry it.
Don’t:
- Skip the mat because the cabinet looks dry; slow leaks hide for weeks.
- Use a fabric liner that stays damp and feeds mildew against the cabinet floor.
- Cover the whole floor and then forget the shutoff valves behind your storage.
A silicone mat, typically 10 to 20 dollars, is cheap insurance under any sink, and in a rented home it can save your deposit. Bins and caddies slide better on its clean surface, and you notice leaks the day they start.
Hanging Trash Bag Holder
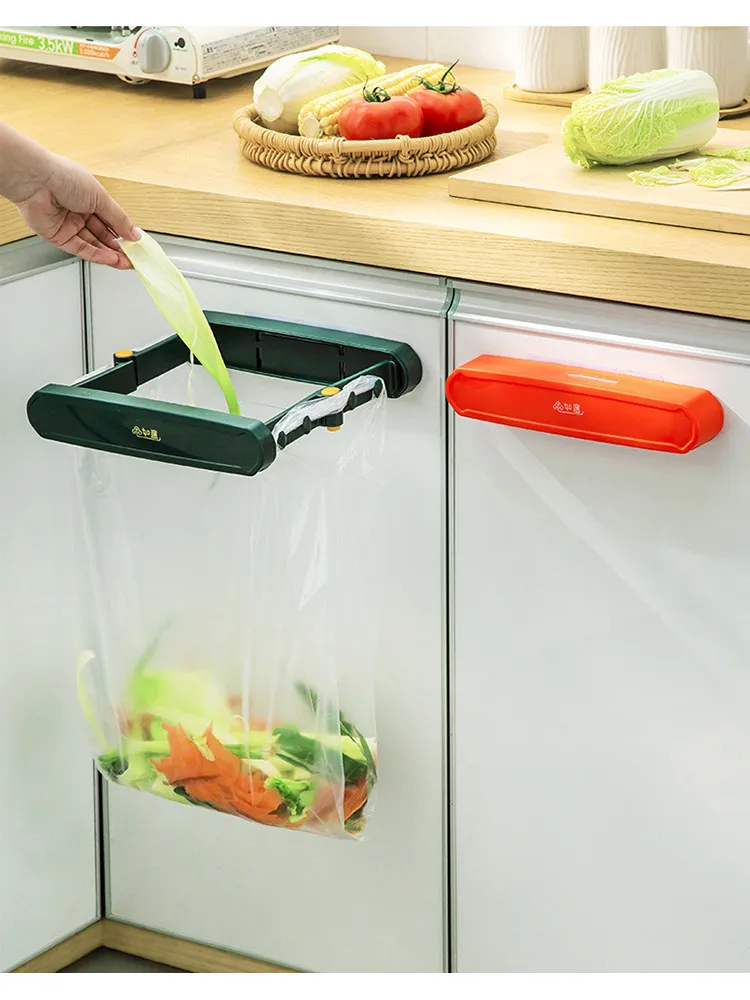
Image Credit: Categoriya (https://categoriya.ru/12087?sort=1&direction=&&page=87)
Cost: Low, usually the price of a takeaway lunch
Time: Under two minutes to clip on and load with a bag
Skill Level: No skill needed, no tools and no drilling
Best For: Prep scraps, peelings and coffee grounds during cooking
A hanging trash bag holder clips over the cabinet door and holds a grocery bag open at hip height, right where you peel and chop. Scraps go straight in, the bag lifts out when full, and the main bin stays cleaner. When guests come, the frame unclips in seconds and stores flat inside the door, and it ends the drip trail between counter and bin.
Wooden Pull Out Drawers
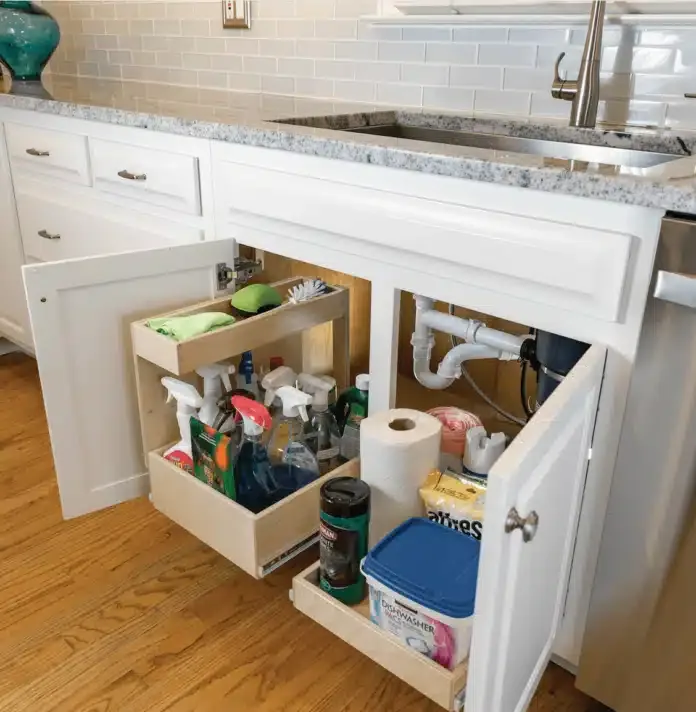
Image Credit: Best Online Cabinets (https://www.bestonlinecabinets.com/blog/must-have-accessories-for-kitchen-cabinets/)
Solid wooden pull outs bring a built in feel to the sink cabinet and cope well with heavy bottles. Here the drawers sit either side of the plumbing, with a shaped top tray and a deep lower box for cleaners. The wood also quiets the clatter plastic bins make.
Measure the trap position twice before buying, because the plumbing decides the drawer widths. A narrower drawer that glides freely beats a wide one that knocks the pipes. Finish raw wood with a coat of clear sealant so drips wipe off instead of soaking in.
Door Mounted Pocket Organizer

Image Credit: HogarMas (https://hogarmas.pe/product/set-de-2-organizadores-flotantes-con-adhesivos/)
- Stick one pocket at sponge height, the second below it for soap refills.
- Use the door that opens away from the trap so nothing knocks the pipes.
- Load light items only; adhesive pads are not made for bulk bottles.
- Test the door swing with the cabinet full; shift a pocket if it clips a shelf.
- Wipe the door with a dry cloth before sticking, because grease is the main reason pads let go.
Two slim pockets turn a blank door into a tidy station for small things that usually wander. Sponges, pads and gloves each get a visible home.
Motion Sensor Cabinet Light
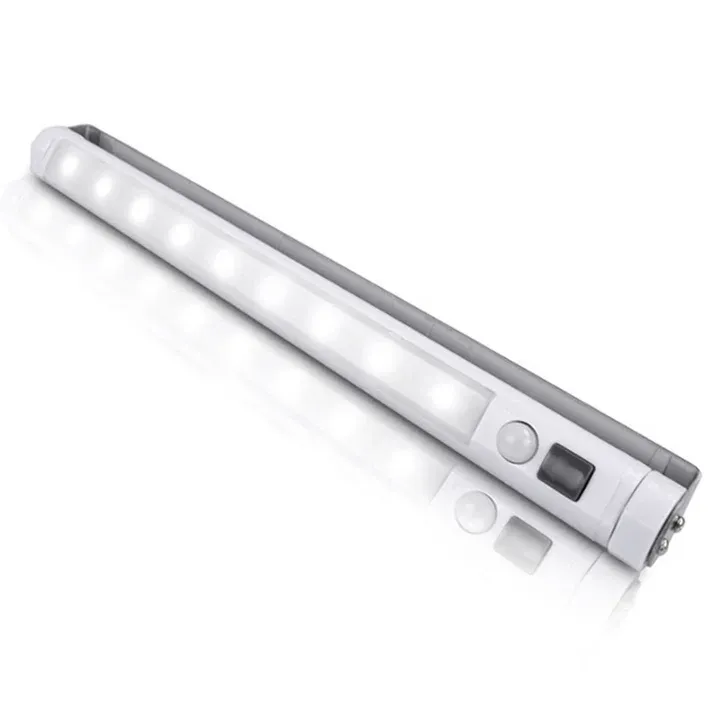
Image Credit: Euro Electronics (https://euroelectronics.eu/it/products/maclean-led-kitchen-lamp-under-cabinet-9-smd-battery-ope)
Quick Tip: Mount the light bar on the front rail inside the cabinet, angled slightly down. It lights the whole floor without shining straight into your eyes.
A motion sensor light bar solves the biggest problem under a sink, which is simply not being able to see what is in there. A slim battery light bar with a motion sensor clicks on when the door opens and off again when it closes, so the back corners stop hiding bottles. Magnetic mounts mean no screws, and most bars run for several weeks on one USB charge. This tiny upgrade makes every other organizer work harder.
Compact Recycling Bin Duo
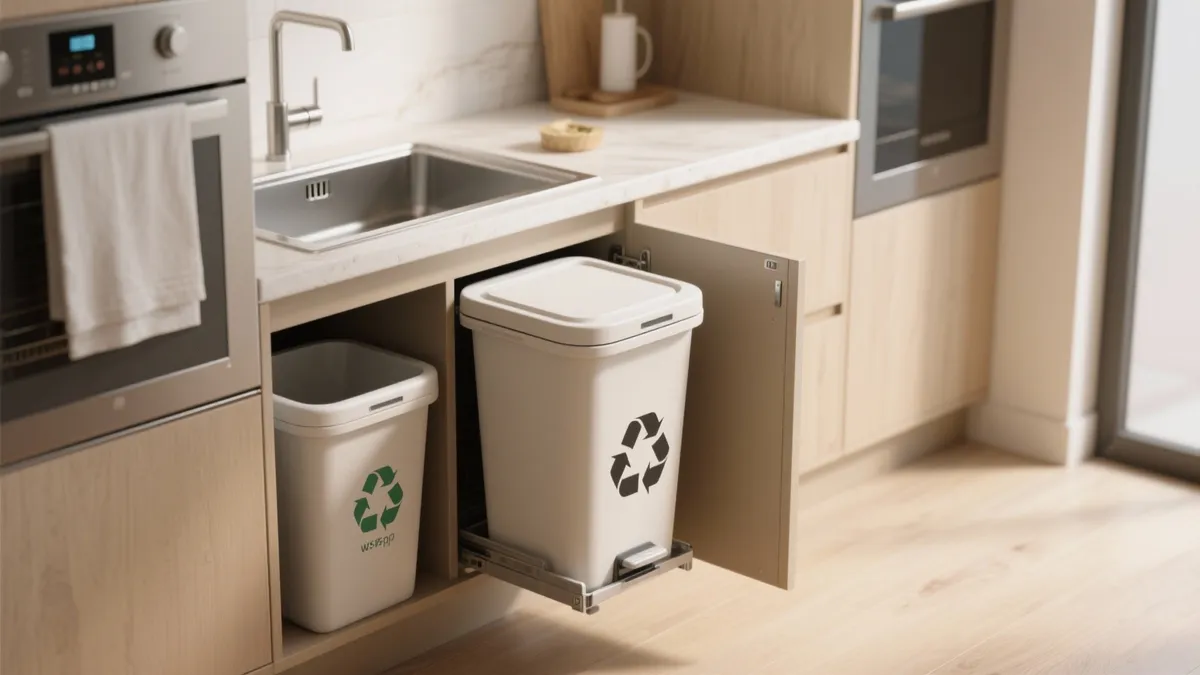
Image Credit: Coohom (https://www.coohom.com/home-design-ideas/kitchen-ideas/smart-kitchen-trash-storage-solution-idt)
Before: Recycling piled up on the counter beside the sink, and the small floor bin overflowed by midweek.
After: Two slim bins now share the sink cabinet, one for general waste and one for recycling, each with its own liner and lid, side by side.
If your cabinet is wide enough on one side of the trap, a pair of narrow bins beats one big bin that never fits. Measure the clear height under the basin so lids open fully, and choose bins with handles so full liners lift out cleanly. Easy sorting makes the habit last.
Tip Out Sink Front Tray
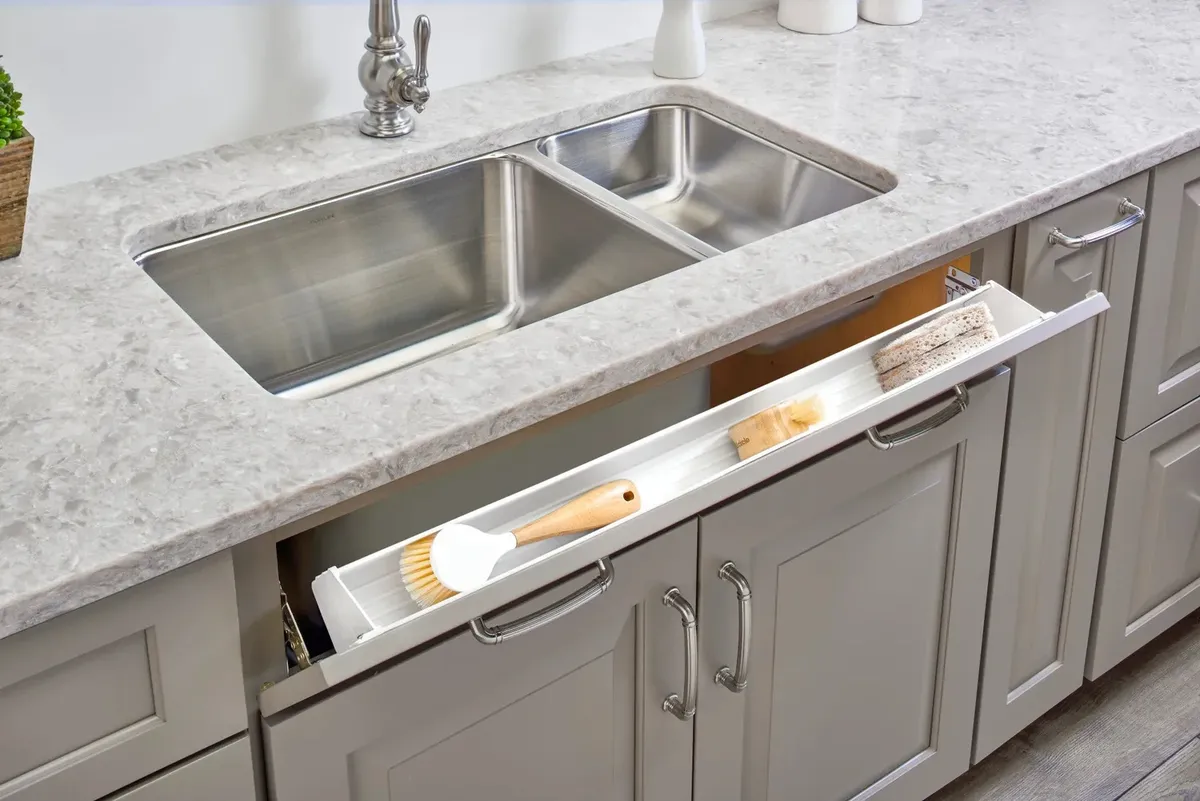
Image Credit: The Woodsman Inc (https://www.thewoodsmaninc.com/store)
- Check your sink front is a false drawer front and measure its inside width.
- Choose a tray kit slightly narrower than the panel.
- Fit the hinges to the cabinet frame first, then attach the tray to the front.
- Test the tilt until the tray opens smoothly and closes flush.
- Stock the tray with flat items only: sponges, brushes, stoppers and the sink plug.
A tip out tray turns the blank panel in front of the sink into a few inches of shallow storage for sponges and brushes. A tip out tray is shallow, so it never touches the basin, yet it swallows the sponge and brush cluttering the sink edge. It is a bigger project, but the payoff is a clear counter every day.
Inside Door Board Rack
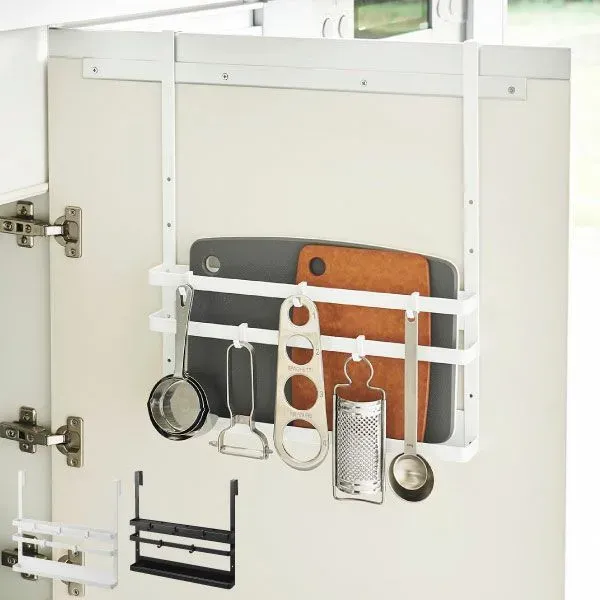
Image Credit: Mono Gallery (https://www.monogallery.jp/c/brand/yamazaki/tower/kitchen-cupboard/074a-990)
Do:
- Hang the rack so two or three boards sit flat and clear the trap as the door closes.
- Keep the rack for boards and flat trays; heavy pans strain the hooks.
- Choose a rack with a lip or strap so boards never slide off.
Don’t:
- Store boards still wet; trapped moisture marks board and door.
- Fix the rack with screws longer than the door thickness, which can poke through the front.
- Load both doors if the cabinet is narrow; the doors may knock together.
An inside door board rack keeps cutting boards upright, dry and close to the prep area instead of sliding and clattering around the cabinet. Standing them in a door rack keeps them upright, dry and close to the prep area, and frees the thin gap beside the trap.
Labelled Clear Storage Boxes
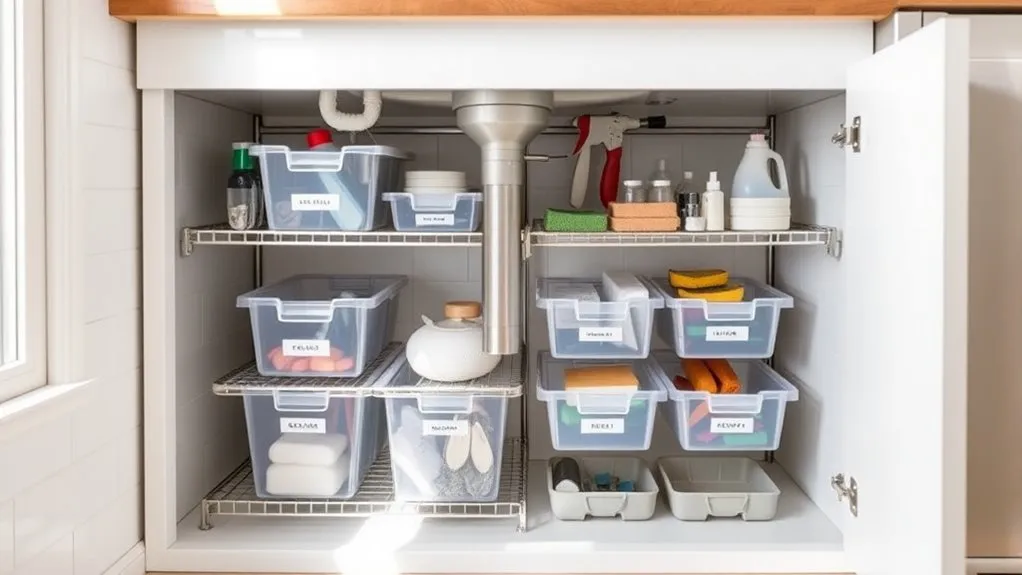
Image Credit: Tiny Cook Lab (https://tinycooklab.com)
Cost: Low to mid, depending on how many boxes your cabinet needs
Time: About 30 minutes to sort, box and label everything
Skill Level: Beginner, only a marker or label maker required
Best For: Mixed small supplies like pods, tabs, cloths and spare brushes
Labelled clear boxes end the hunt for the right cleaner, because every box states plainly what it holds. Clear boxes on low shelves keep each family of supplies together, and a plain label on every box means the system survives busy weeks. Write labels by job rather than brand, such as dish pods or floor wash, so the boxes still make sense as products change.
Clear Canisters Beside Disposal

Image Credit: Pinvibe (https://www.pinvibe.com/account/fleminglh)
Because a garbage disposal takes the centre of the cabinet, clear canisters give the two side pockets shallow, visible storage. Clear canisters suit those pockets well: dishwasher pods, tablets and powder stay dry, sealed and easy to count at a glance. Because the canisters are shallow, nothing hides behind the disposal, and a quick look shows when supplies run low.
Keep food related items, like sink strainers and bottle brushes, in one canister and chemicals in another, clearly apart. If your disposal vibrates, choose canisters with snug lids and flat bases.
Grey Basket Cleaning Caddies

Image Credit: All In Stripes (https://www.allinstripes.com/the-best-kitchen-organization/)
- Pick two handled baskets that sit side by side without crowding the trap.
- Load one with daily dish supplies and the other with weekly cleaning products and cloths.
- Keep baskets a hand width from the water lines so a drip never soaks the contents.
- Carry a whole basket to other rooms when you clean there, then bring it back.
- Choose open weave plastic that rinses clean when a bottle leaks.
Matching baskets give the cabinet a calm, planned look for very little money. They also set a natural limit on products, because a new bottle only joins when there is space. That limit stops the slow creep back into clutter.
Hanging Side Basket Pair
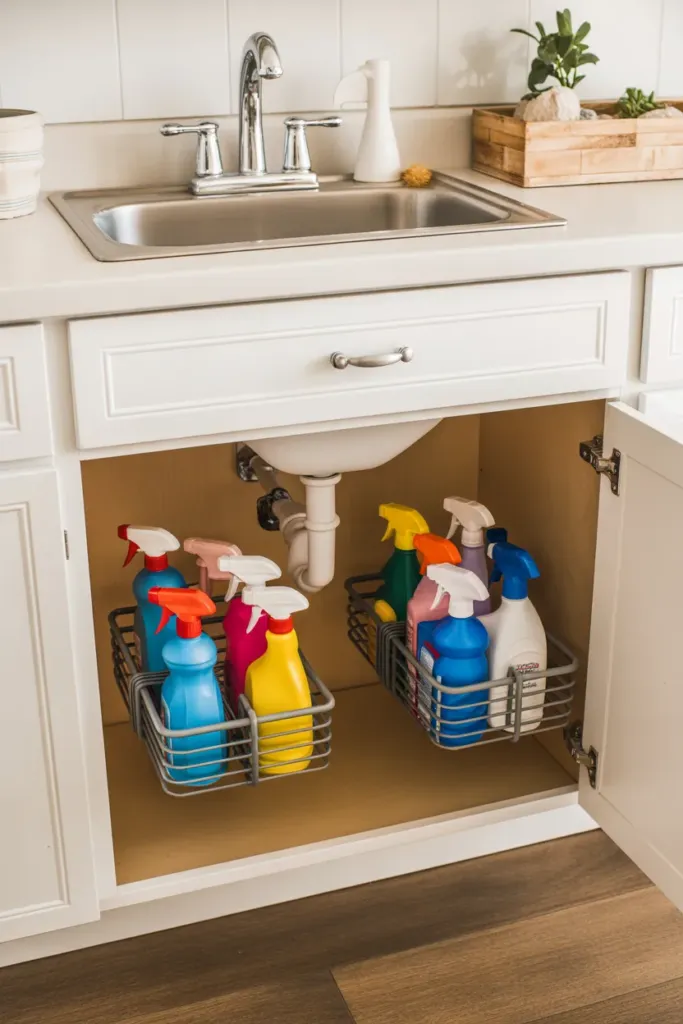
Image Credit: Mom Life Haven (https://momlifehaven.com/diy-organization-hacks-for-your-home/)
Quick Tip: Hang baskets at slightly different heights on each side of the cabinet. The taller sprays then clear the trap while shorter bottles sit lower and stay stable.
The walls of the sink cabinet are free storage, and a pair of hanging side baskets puts them to work. Hanging wire baskets hook over the inner sides or door edges and hold spray bottles upright in view. Because they hang, the floor stays open for a bin or a pull out unit. This pairing suits narrow cabinets where floor systems leave no servicing room.
Slim White Bin Set
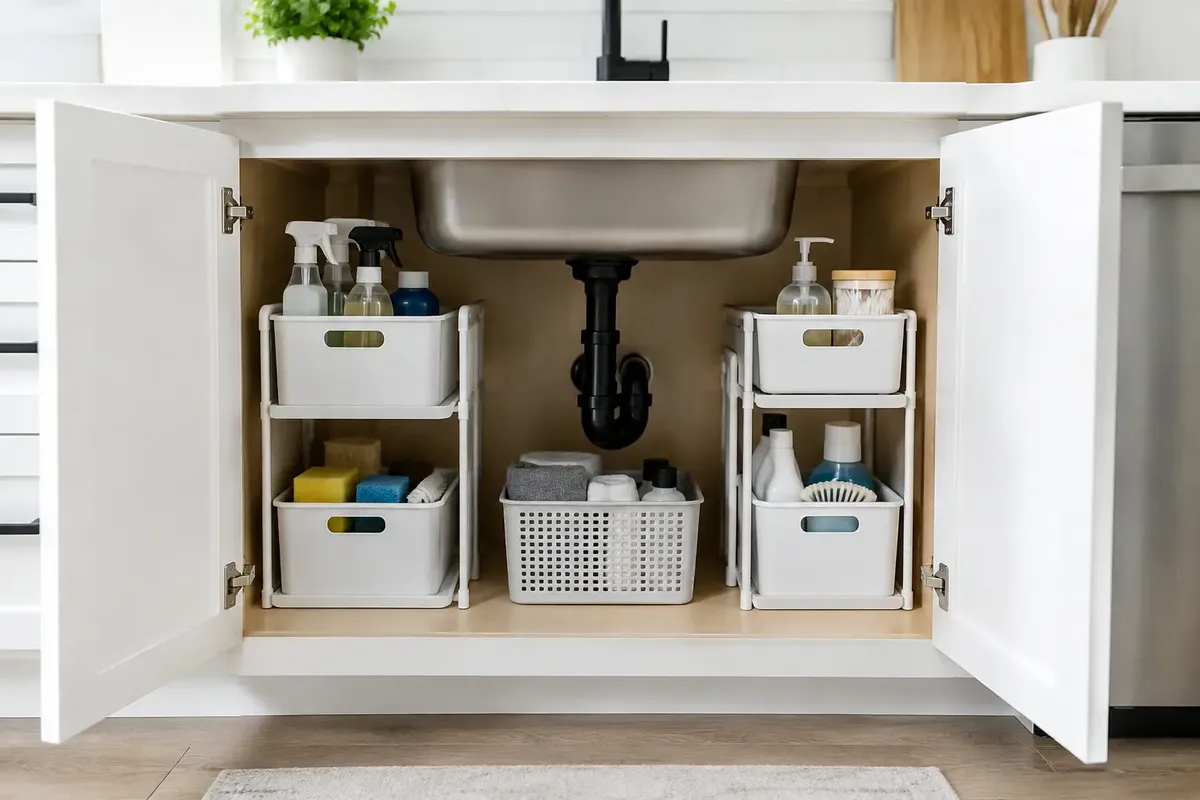
Image Credit: WordPress Blog (https://i0.wp.com/www.soulsprehomedecor.com/wp-content/uploads/2025/09/under-sink-3.jpg)
Before: Loose bottles and a tangle of plastic bags shared the cabinet floor, and the space smelled faintly of damp.
After: A neat row of slim white bins and small racks now lines both sides of the black trap, each bin holding one family of supplies, all visible at a glance.
A matching set of slim bins gives a small cabinet a sense of order out of proportion to its size. White shows drips early, an early warning system for leaks. Keep bins narrow enough, about six inches wide, to slide past each other, and the arrangement stays easy to rearrange.
Chrome Pull Out Tier Racks
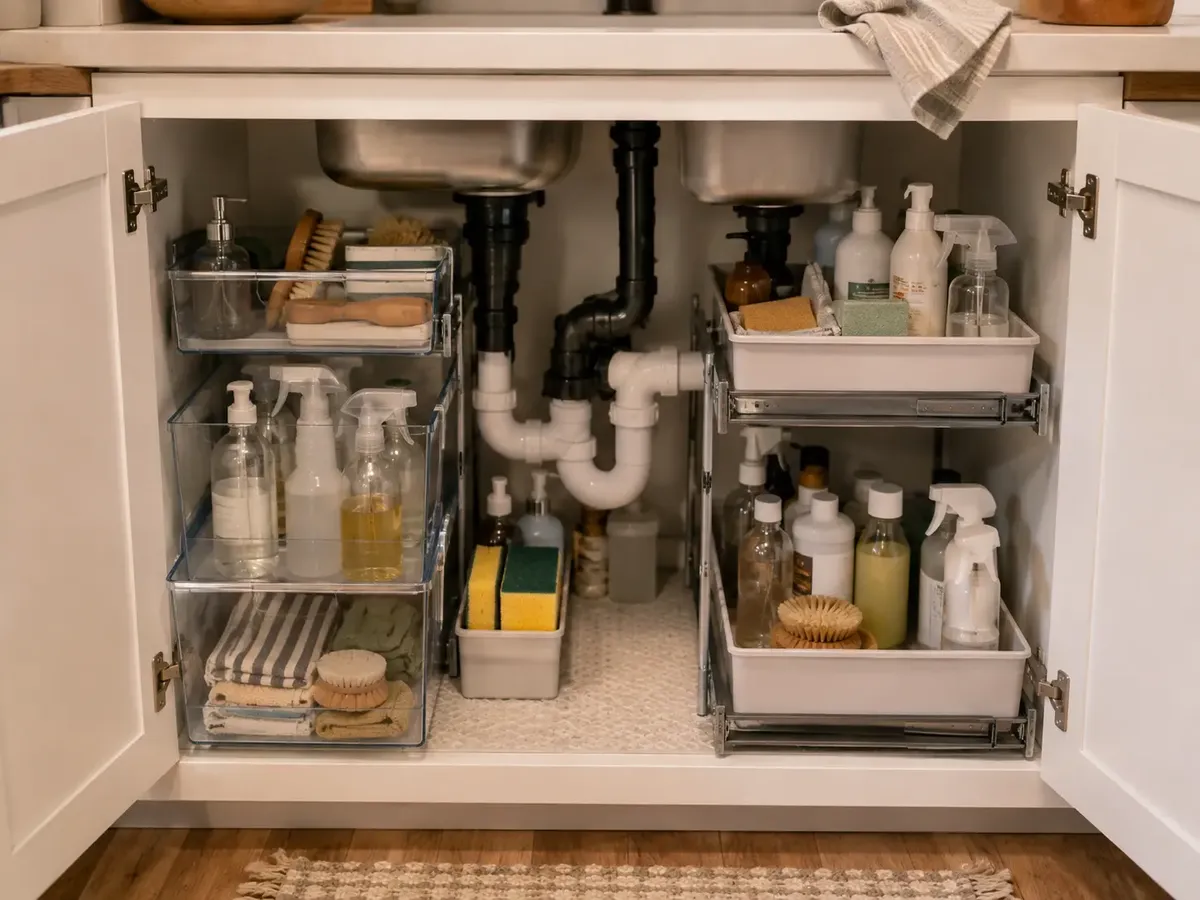
Image Credit: Tidy Little Home (https://www.tidylittlehome.com/under-sink/)
- Clear the cabinet and check the floor is level; racks wobble on a warped base.
- Position the racks either side of the trap and mark each base frame.
- Fix the frames, then hang the tier baskets on their runners and slide them in and out to test.
- Load lower tiers with heavy bottles, upper tiers with pods and sponges.
- Close both doors slowly to confirm nothing catches the hinges or trap.
Chrome tier racks make the cabinet feel almost like a fitted kitchen. The open wire lets air flow around damp items, and each tier slides separately, so you never move the whole unit for one bottle. Wipe the runners every few months so grit never roughens the glide.
Plastic Bag Dispenser Duo

Image Credit: Cults3D (https://cults3d.com/zh/3d-m%C3%B3x3Dng/sh%C7%92uy%C3%A8/dish-sponge-organizer-with-hanging-)
Do:
- Hang dispensers inside the door where bags pull out one at a time.
- Roll each bag before loading so the dispenser holds more and feeds smoothly.
- Keep one dispenser for clean bags and, if you like, a second for sponges or cloths.
Don’t:
- Stuff bags in loose, recreating the tangle you were avoiding.
- Mount the dispenser where it presses against bottles when the door closes.
- Hang it low enough to sweep the floor or sit in a drip.
A plastic bag dispenser is the simple fix for loose bags, which breed in sink cabinets, filling corners and hiding bottles. Two slim dispensers gather them into one tidy column and hand you a bag when you need one. A small change, but it removes the most annoying mess in most sink cabinets.
Low Profile White Racks
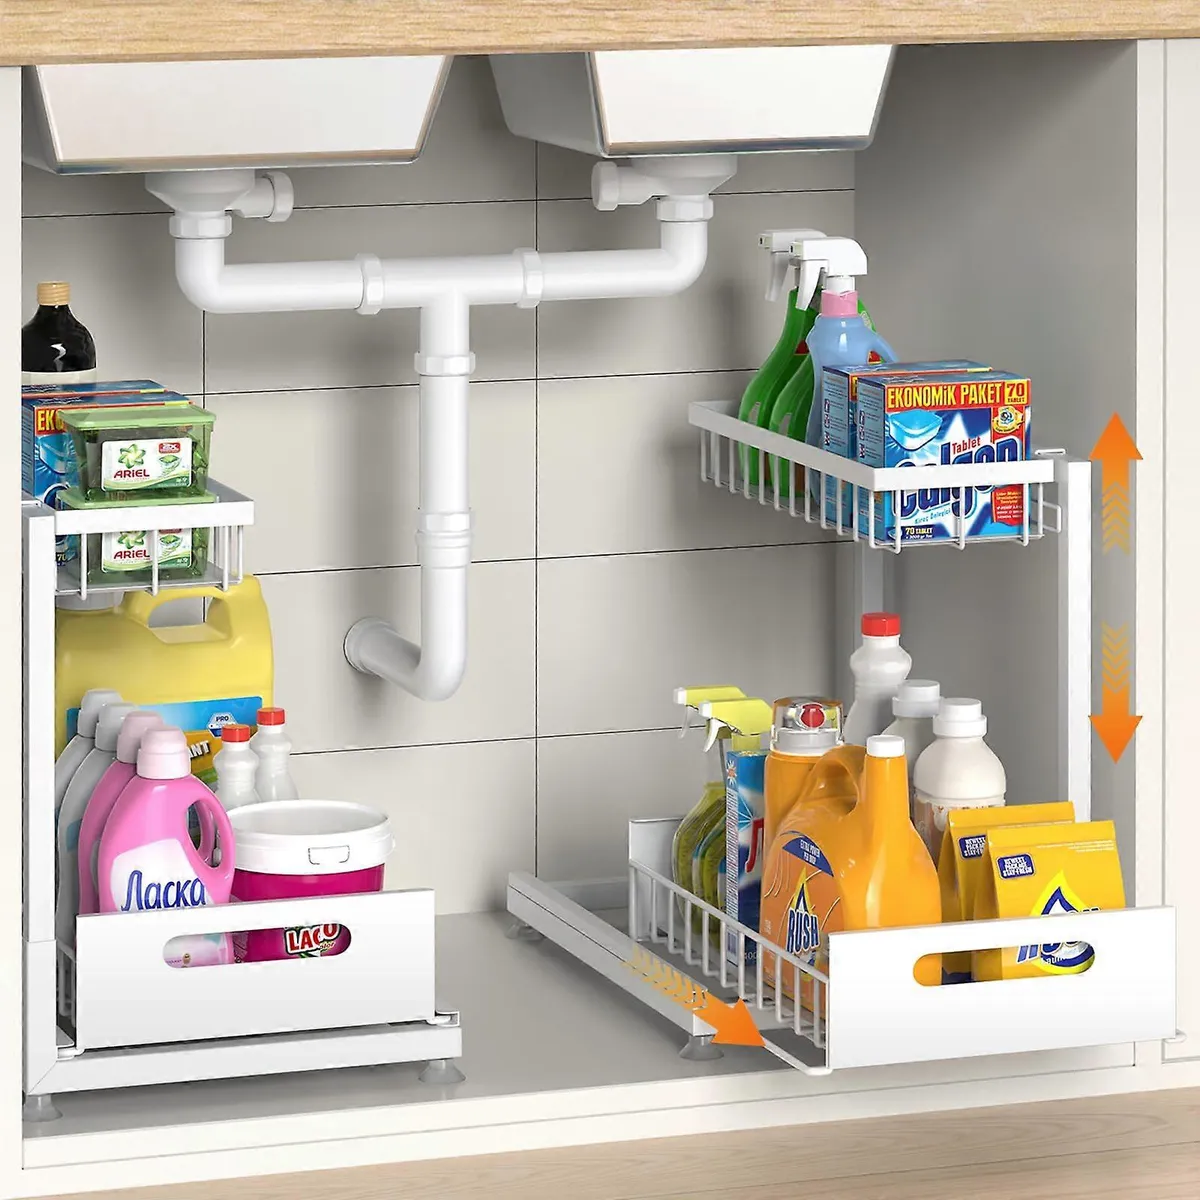
Image Credit: Fruugo UK (https://www.fruugo.co.uk/premium-under-sink-storage-organizer-for-kitchen-2-tier-adjustable-dur)
Cost: Low, these are among the cheapest framed racks available
Time: About 10 minutes to assemble both racks by hand
Skill Level: Beginner, the parts push and click together
Best For: Shallow cabinets where tall organizers hit the basin
Low profile racks add a second level of storage in shallow cabinets where a deep basin eats the height. Low profile racks respect that limit, giving you a modest second level on each side of the trap without looming over the floor stock. Bottles stand on the floor while sponges and pods ride on the racks above. In a shallow cabinet, this modest lift is the difference between one layer of mess and two of order.
Pipe Friendly Stepped Shelf
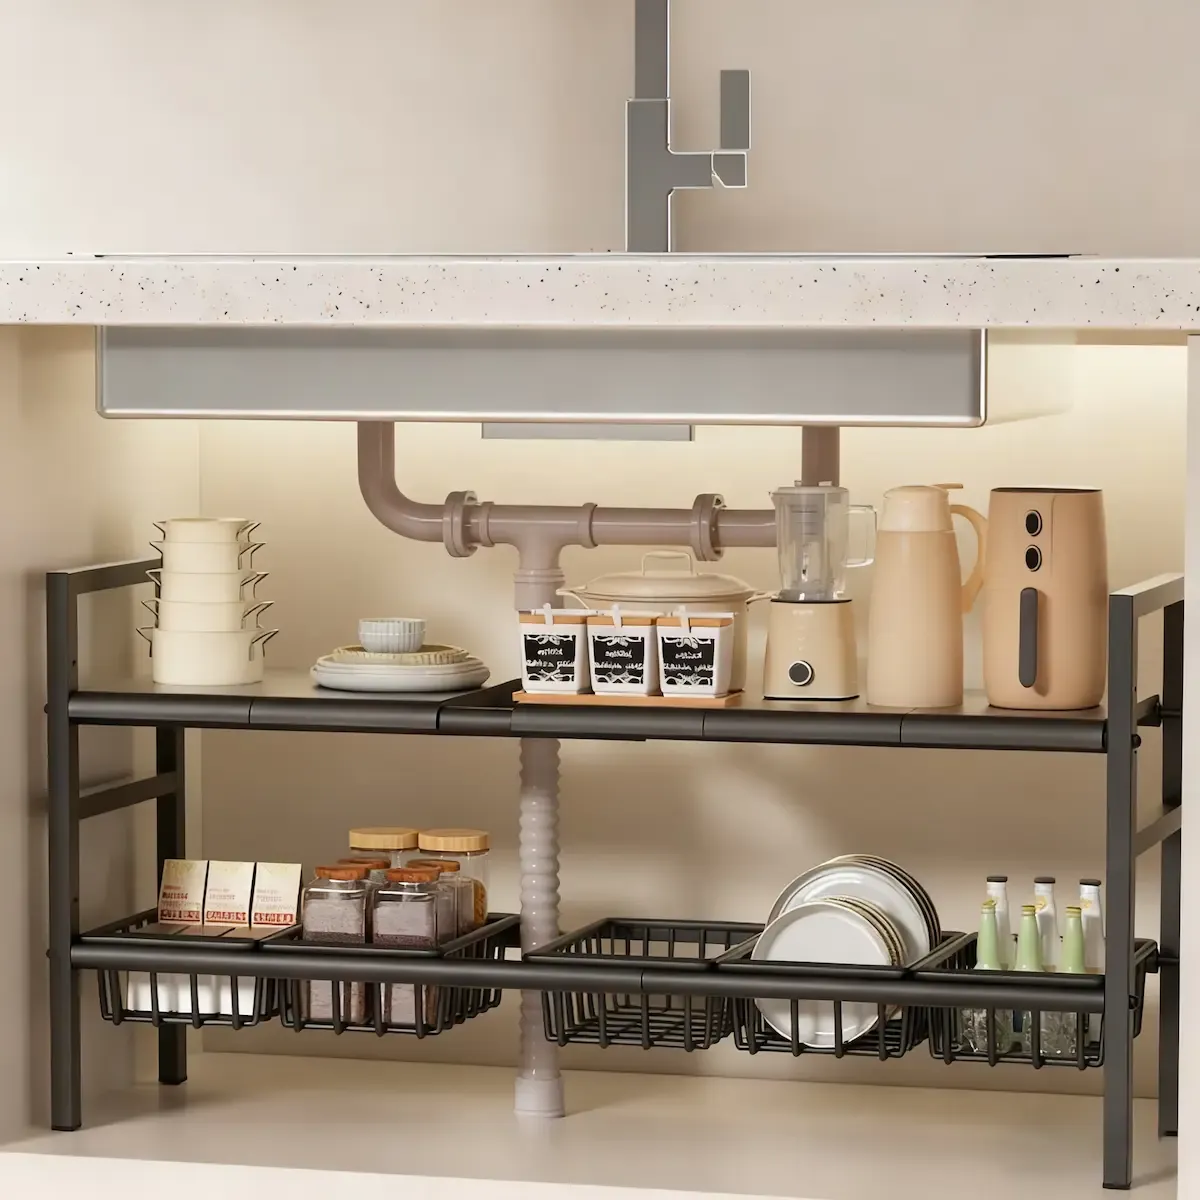
Image Credit: Rangeora (https://rangeora.fr/produit/etagere-de-rangement-sous-l-evier-extensible-solution-de-rangement-)
A stepped shelf lifts the back row about four inches above the front row, so every label stays visible without any digging. The steps also step around the plumbing: tall bottles stand where the basin allows, and shorter jars take the lower front step near the door. Here the black frame holds jars and a kettle beside the trap, proof the space can serve daily cooking items too.
Load the steps back to front, starting with the tallest, heaviest pieces. Keep the front step for daily items.
Five Minute Weekly Reset

Image Credit: To The Sunny Side (https://www.2thesunnyside.com/25-ideas-organizing-under-kitchen-sink/)
- Empty one side at a time and wipe the mat before anything goes back.
- Check bottles for drips and the trap joints for slow leaks.
- Return each item to its labelled home, daily supplies to the front.
- Remove anything that belongs elsewhere; the sink cabinet attracts strays.
- Restock sponges and bags so the cabinet starts the week complete.
A five minute weekly reset is all the upkeep an under sink system needs to keep working. The reset doubles as your leak check, stock check and clutter brake. Pair it with bin night, and the cabinet stays as tidy as the day you organized it.
Common Questions
How do I organize around the pipes under my sink?
Measure the trap position first, then choose organizers with a gap in the middle, like U shaped drawers or two narrow shelves, one on each side. Leave the valves and joints clear so a plumber can reach them quickly.
What should I store under the kitchen sink?
Keep items you use at the sink every day: dish soap, sponges, dishwasher pods, surface spray and a small trash or recycling bin. Move rarely used chemicals and bulk refills elsewhere so the small space stays easy to reach.
How do I stop leaks damaging the cabinet floor?
Line the floor with a waterproof silicone mat that has a raised edge to hold small spills. Check under the mat every week, wipe drips straight away, and fix slow leaks early before they swell or stain the cabinet base.
Can I organize a rented kitchen sink cabinet without drilling?
Yes. Tension rods, over door racks, adhesive holders and freestanding shelf risers all fit without screws. Choose removable options, keep a mat underneath to protect the floor, and take everything out when you move, leaving the cabinet unchanged.
Conclusion
Thirty ideas is plenty, so start small: measure, clear the cabinet out, and add the one system that solves your biggest daily annoyance, be it a sliding caddy, a door rack or a simple mat. The best under sink organization for small kitchens is the setup you can keep tidy in five minutes a week, with every bottle visible and nothing lost behind the pipes. Save this list to your kitchen board on Pinterest, share it with a friend whose sink cabinet needs help, and try your first idea this weekend. Small changes under the sink make the whole kitchen feel calmer every day.